

Quarter Square Triangles are a very versatile quilting block and look great on their own as a quilt or mixed in with other quilt blocks. In this tutorial I’ll be sharing 3 ways to make Quarter Square Triangles, or QSTs, plus a handy chart to help you out with the math if you want to customize the block size.

I ended up putting all my Quarter Square Triangles together to make this small quilt top. When QSTs are arranged in this pattern it’s called an Hourglass quilt block and it’s an easy quilt pattern for beginners. It’s also a great way to use up leftover fabric and make a scrappy quilt.

Quarter Square Triangles show up a few times in this sampler quilt I’m working on. For example, the Chain and Bar, Marion’s Choice and Ohio Star quilt blocks all use QSTs (see below). My quilted Fall table runner also uses QSTs with some squares to break them up – it’s a great beginner quilting project!


To make Quarter Square Triangles, you always start by making a Half Square Triangles which I show in each method below. It may be helpful to read through my Half Square Triangle tutorial if you’ve never made one before. You will also need to cut out squares or use precut squares, like from a charm pack. If you need more detailed instructions, head over to my tutorial How to Cut Squares For Quilting.

This page contains some affiliate links to products and I may receive a small commission for purchases made through these links (at no extra cost to you).
Some Things You’ll Need
- Choice of fabric – cotton is easiest to work with, but I’ve also used linen.
- Rotary blade
- Cutting mat
- Quilting ruler – Square ones are good for this, just make sure it’s bigger than the square you’re working with.
- Fabric marking tool – I’m using a Frixion pen which disappears with heat.
- Iron
- Coordinating thread
The quilting cotton I’m using in my example is the On The Sunny Side (Afternoon Picnic) collection by Connecting Threads which was kindly gifted. From each fat quarter I cut 3 of each fabric design in 6″ squares to make the quilt top shown above. This made 60 QST blocks and the finished size is 27 1/4″ wide by 45 1/4″ long. I could have easily kept going since there’s plenty leftover!
Quarter Square Triangle Math
If you’re following a quilting pattern, most of the time it will have you cut the QSTs down to a certain size. If you’re not following a pattern and don’t need exact measurements, it’s still a good idea to at least square up your QST and cut off the little bits of fabric poking out – this will make sewing them together easier and your seams more accurate.
To figure out what size to cut the starting squares, add 1 1/2″ to the desired finished QST size. A finished QST is when that block has been sewn to the other blocks in a quilt. This gives you enough wiggle room to then trim down the QST
Below is a chart with the QST math already done for you!

Quarter Square Triangle Method 1
This is the most common Quarter Square Triangle method I have seen used and more beginner friendly. To me, this method feels longer – maybe because the cutting steps are spread out – and I find it a little harder to get neat points at the center.
Start by placing two squares right sides together. With the lighter fabric up, draw a line across the square from corner to corner. Note: You can also use a 1/4″ seam ruler here.


Then sew along both sides of that middle line with 1/4″ seam allowance.

Line up a ruler along that center line and then cut the square in half with a rotary blade.


Now you have two Half Square Triangles (HSTs)! Press the seams open, or to the side if you prefer.
Note: For this method, pressing the seams to opposing sides can make it easier to nest the seams together on the next step. I am showing how to do it with the seams pressed open.

Then, take the two HSTs and place them right sides together with opposite fabrics touching each other. Draw a line down the middle, from corner to corner, perpendicular to the first seam.


With this method, you need to make sure the center seams are aligned and placing pins can help keep it in place. Sew along both sides of the middle line with a 1/4″ seam allowance.

Next, take your ruler and line it up along that middle line and cut with a rotary blade.


You now have two QSTs! Press the seams open, or to the side.


The final step is to trim down your QSTs. With a ruler, line up the 45 degree line along one of the seams. I’m trimming mine down to 5″, so I try and center the QST underneath the ruler using the 5″ marks and the outer edge of the ruler. The goal is to try and cut off the same amount from all sides so that your corners are symmetrical.
Trim off two sides without moving the ruler, then turn the QST and trim off the last two sides.


Quarter Square Triangle Method 2
Out of the three methods I’m showing, this is my preferred method of making Quarter Square Triangles because I find I get neater points in the center. The cutting takes a little more precision, which you’ll see, but I like that the majority of the cutting is done at the beginning.
Again, like the first method, you will start by making a Half Square Triangle. Place two squares right sides together and mark a line down the middle from corner to corner.


Sew along both sides of the center line with 1/4″ seam allowance.


Line up a ruler along that center line and cut with a rotary blade. Don’t move the squares, but instead rotate the ruler and make a cut, perpendicular to the first, from corner to corner.
Note: This is where a rotating cutting mat comes in handy, or you can cut on a smaller cutting mat and turn the cutting mat instead of having to twist your arm. I also found that cutting near the edge of a table at the corner gave me enough room for my arm to make the two cuts more easily.


Now you should have four halves of the square divided into quarters (see photo below). Double check that you can place them together with opposite fabrics touching each other. Press seams open, or to the side if you prefer.


Place the two halves right sides together with opposite fabrics touching. Pin together making sure to line up the center seam. Then sew together with a 1/4″ seam allowance.


Press the seams open or to the side and you have two QSTs!

Next trim up your squares to your desired size (I’m trimming mine to 5″). With a ruler, line up the 45 degree line along one of the seams. The goal is to try and cut off the same amount from all sides so that your corners are symmetrical.
Trim off two sides without moving the ruler, then turn the QST and trim off the last two sides.


Now you have your finished trimmed QSTs!

Quarter Square Triangle Method 3
I found out this method by accident when I had made a mistake on one of my blocks and had to unpick it. This is a more time consuming way to make Quarter Square Triangles, but it’s pretty easy and you don’t need to do any marking! I’m not sure when someone would need to make a QST this way, except if a mistake was made or maybe only a few QSTs are needed for a pattern. Either way, I think it’s a helpful method to know!
Start with two squares. You can stack the squares on top of each other if you want – I’m cutting both individually in my example.

Line up your ruler from one corner of the square to the opposite corner and cut. Without moving the square, make another cut, perpendicular to the first, from corner to corner.


You will now have two squares cut into 4 quarters (or 8 right angle triangles). Arrange the quarters as shown below, with the alternating fabrics next to each other.
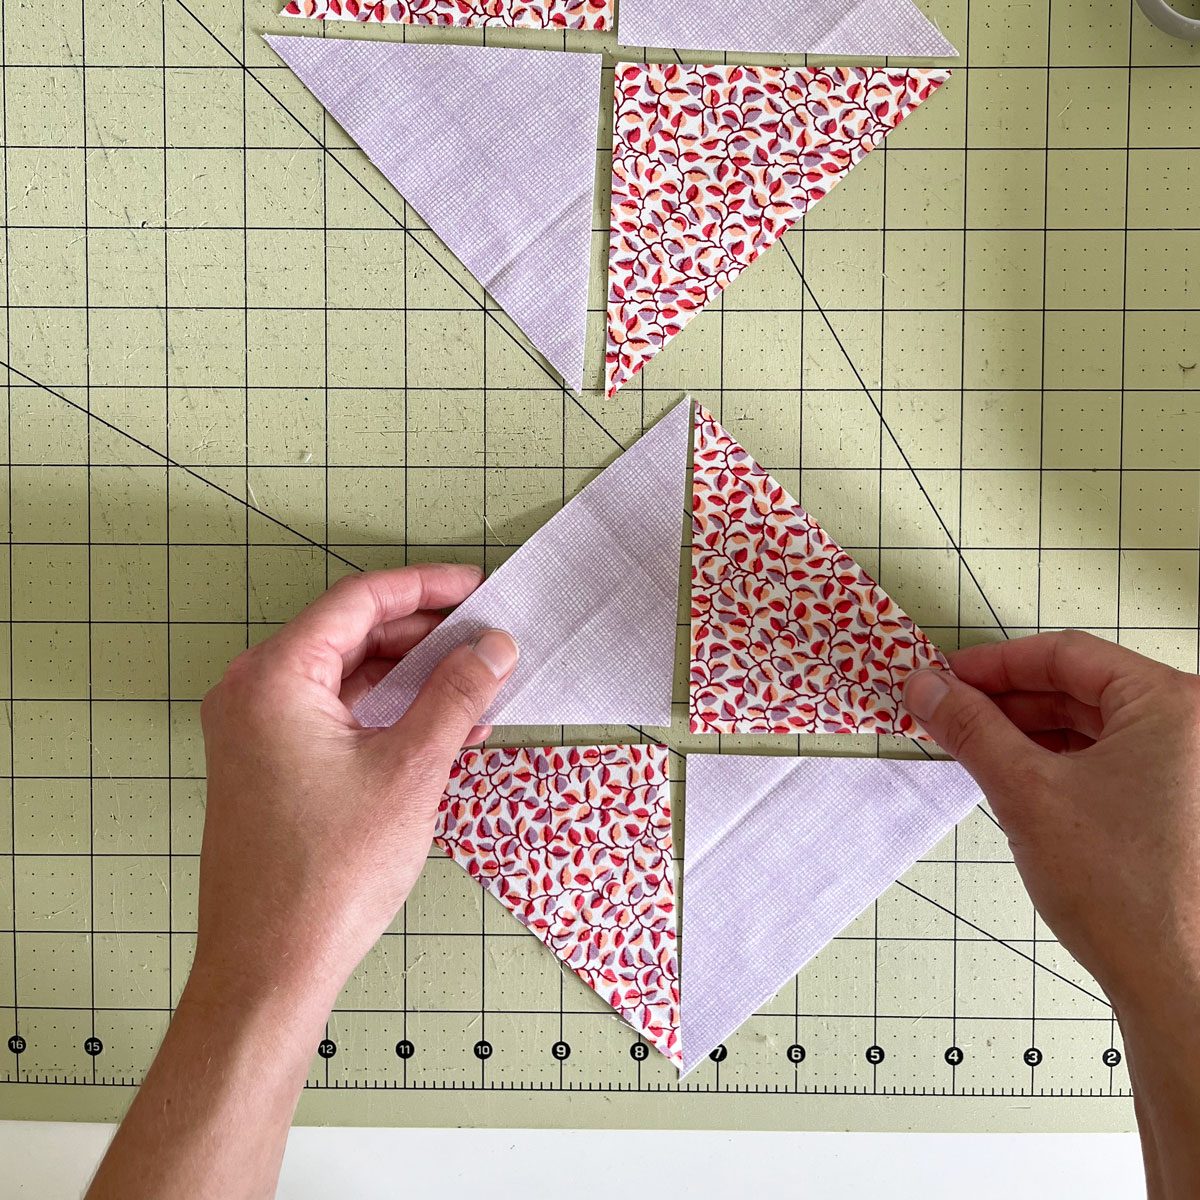
Next, place the triangles right sides together. This can either be with the triangles to the right and left of each other, or top and bottom.


Pin the triangles together with the straight edges lined up and sew with a 1/4″ seam allowance.


Unfold all your triangles and press the seams open or to the side. Arrange the two halves together so the opposite fabrics are together and pin together making sure to line up at the center seam.


Sew together with a 1/4″ seam allowance and press open or to the side. Trim down your QSTs to the desired size using the method shown above (I forgot to take pictures of this step with the QSTs shown below).


And those are three ways to make Quarter Square Triangles!

Hope you enjoyed this tutorial and let me know if you end up making anything with QSTs! Happy sewing 🙂


Just curious, I don’t have a sewing machine, is this possible to do completely by hand? Thinking about getting a mini machine, maybe I will for this project.
Yes, it’s possible to do all by hand! I’ve never tried it myself though. I would look up some hand stitching techniques for hand piecing to make sure there’s no gaps at the seams. Or a mini machine is a good option too! Happy sewing 🙂
-Bethany
Thank you for showing three different ways.
I piece by hand. You will need to make sure your mark a scant quarter inch rather than a quarter inch or your blocks come out slightly too small. I found that the tick marks for the 1/4 and 3/4 inch placements on my cutting rulers when lined up on the edge made a perfect quarter inch when marking with a washable pencil! Then, you use either a running stitch or a back stitch to piece. If using a running stitch, you need to back stitch every 1/2 or 1″ to lock the running stitch in place. I prefer back stitch because it creates a stronger seam and then I can strip piece if a pattern calls for strip piecing!